(New) Layer Function Controls
Designers can now switch Record Time, Add Reaction, and Add/Remove Layer on or off per template, and per layer within it — the more restrictive setting always wins.
Every generic element layer header carries a few common buttons — Record time, Add reaction, Add/remove layer. Until now these always appeared, on every template, for every user. A Designer can now switch each one on or off per template, and — since a follow-up enhancement — per individual layer too.
Table of Contents
- How It Works
- How to Setup
- Per-Layer Configuration
- Example Scenario
- 🚀 How to Participate in the Preview
How It Works
Audience: Users
Interface: Chemotion ELN – Generic Element detail view
When a Designer turns one of these off — for the whole template, or for just one layer — the matching button simply isn’t there on the layer header of any element made from it. Nothing to configure, the form is just simpler.
Primary Benefits:
- Cleaner forms: templates that never need a reaction layer or a manual timestamp aren’t cluttered with those buttons.
- Consistent everywhere: the moment a Designer changes a switch, every element opened from that template reflects it — old and new alike.
- No data lost: hiding a button never touches data already recorded through it; it only stops new use of that button.
How to Setup
Audience: Designers
Interface: Generic Elements Designer → Template settings
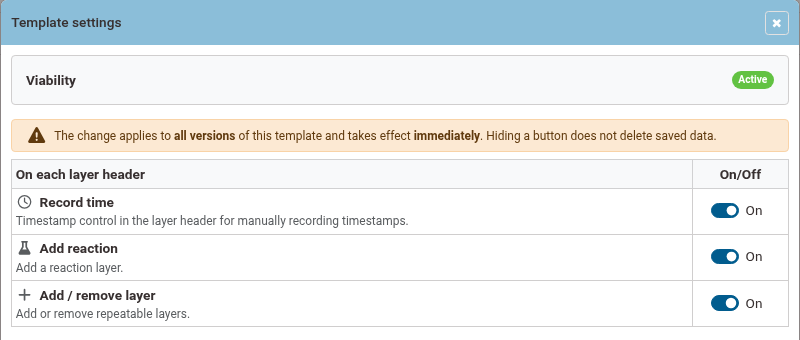
The three switches live in the same Template settings panel used for Cover Image.
Configuration Steps:
- From the top-right user menu, open Generic Designer → Generic Elements Designer.
- On the element’s row, click the gear icon (Template settings) in the Template column.
- Under On each layer header, switch Record time, Add reaction, or Add/remove layer on or off.
(Click to view in a new window )
Key Points:
- Independent switches: each of the three controls is set separately — turning one off doesn’t affect the others.
- Binds to the template, not a version: the setting lives on the template itself, so it isn’t something to re-set on every release.
- Immediate: the panel warns that a change “applies to all versions of this template and takes effect immediately.”
Per-Layer Configuration
The same three switches can now also be set per layer, for when only one layer in a template needs to differ from the rest.
Configuration Steps:
- Click Edit this template (the document icon) in the Template column to open the template in the Work Area.
- On the layer you want to adjust, click … (More layer actions).
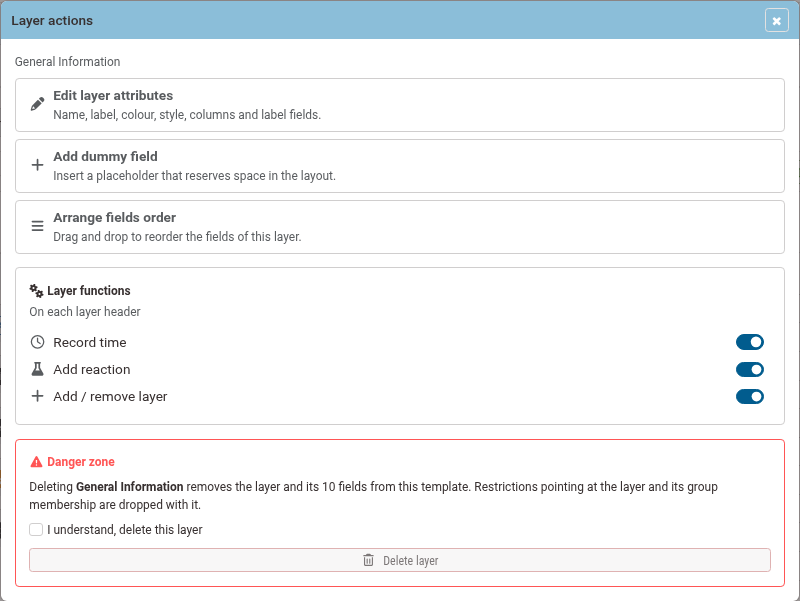
- In the Layer actions modal, find Layer functions and switch Record time, Add reaction, or Add/remove layer for that layer alone.
(Click to view in a new window )
Key Points:
- Most restrictive wins: the effective state is template and layer combined — if a function is off at the template level, its per-layer switch shows disabled (“Off at template level”) and can’t be turned back on for just one layer.
- Version-bound: unlike the template-wide setting, a per-layer choice is saved with that layer and released as part of the template version.
Example Scenario
- A Designer opens Generic Elements Designer, clicks the gear icon on an element that never needs a reaction layer, and switches Add reaction off — this applies to every layer, template-wide.
- On a different template, a Designer instead opens one specific layer’s Layer actions modal and switches Add reaction off there only — other layers on the same template keep the button.
- Every element made from either template reflects the change immediately, old and new alike; elements that already had a reaction layer keep it, only the button to add another one is gone.
Note: This feature is currently in preview and may undergo further refinements based on user feedback.
🚀 How to Participate in the Preview
Follow these steps to explore the new features and share your insight:
🖥️ Visit the Staging Instance
Access the preview environment at: labimotion-stage.ibcs.kit.edu🔍 Explore and Test
Try out the enhancements — see how they fit your workflow.❤️ Your Feedback Matters
Share your comments or report any issues in our GitHub Discussion Thread.
We appreciate your help in testing these new features!