(New) Cover Image for Generic Elements
Give a generic element a cover image built from its own attachments and analyses, shown right above its tabs.
Generic elements can now show a cover image — a fixed-size strip of pictures rendered above the element’s tabs, built from images you already have on the element. No separate upload: you pick from its existing Attachments and Analyses. A Designer switches it on for the element first.
Table of Contents
How It Works
Audience: Users
Interface: Chemotion ELN – Generic Element detail view
Where an element has Cover Image switched on, its page shows a fixed-size image block above its tabs, paging through whichever images you’ve picked for that element.
Primary Benefits:
- Recognize at a glance: Identify an element by sight before opening any tab or attachment.
- Nothing new to upload: Every image comes from what’s already on the element — its Attachments and its Analyses.
- Your pick, your order: Choose which images show and in what order; anything not picked simply isn’t shown.
Using It:
- Open the picker on the element page, from its cover image area.
- Choose images from a candidate list drawn from the element’s Attachments and Analyses.
- Order them — the order you choose is the order they page through in.
- Close it — the strip above the tabs now shows your selection.
How to Setup
Audience: Designers
Interface: Generic Elements Designer → Template settings
Cover Image is opt-in per element, set from the same Template settings panel as the other layer-header controls — not from the Segment or Dataset Designer.
Configuration Steps:
- From the top-right user menu, open the Generic Designer → Generic Elements Designer.
- On the element’s row, click the gear icon (Template settings) in the Template column.
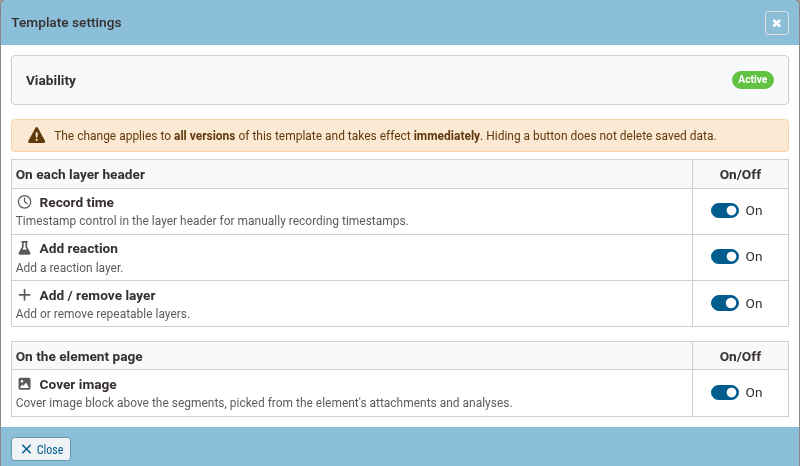
- Under On the element page, switch Cover image on.
(Click to view in a new window )
Key Points:
- One switch among several: Cover image sits under “On the element page”, alongside the existing “On each layer header” controls (Record time, Add reaction, Add/remove layer) — each element is configured independently.
- Immediate, not versioned: the panel warns that the change “applies to all versions of this template and takes effect immediately.”
- Hiding doesn’t delete data: switching it off hides the block; any images already selected on elements aren’t lost.
Example Scenario
- A Designer opens Generic Elements Designer, clicks the gear icon on the Viability row, and switches Cover image on.
- A User opens a Viability element that already has attachments or an analysis with images.
- They open the cover image picker and pick a couple of images to show.
- The chosen images now page through in a strip above the element’s tabs — for every Viability element, until a Designer switches it off again.
Note: This feature is currently in preview and may undergo further refinements based on user feedback.
🚀 How to Participate in the Preview
Follow these steps to explore the new features and share your insight:
🖥️ Visit the Staging Instance
Access the preview environment at: labimotion-stage.ibcs.kit.edu🔍 Explore and Test
Try out the enhancements — see how they fit your workflow.❤️ Your Feedback Matters
Share your comments or report any issues in our GitHub Discussion Thread.
We appreciate your help in testing these new features!